Motomichi Works Blog

モトミチワークスブログです。その日学習したことについて書いている日記みたいなものです。

webpackを使ってES2015、React.jsのビルド環境を構築する

参考にさせて頂いたページ

webpackのすごく基本

webpack で始めるイマドキのフロントエンド開発 - Qiita

主に参考にさせて頂いたページ

Webpackでイチから作るReact.js開発環境 - Qiita

babelとwebpackを使ってES6でreactを動かすまでのチュートリアル - Qiita

grunt glup webpack それぞれでBabelでES2015の自動コンパイル環境を作る(比較のため)

BabelでES2015の自動コンパイル環境を作る(Browserify / gulp / Grunt / webpack) | mae's blog

.babelrcがバージョン6以降は必要だとかそういう感じの話

Babelを6系にアップデートしたらgulpでこける - Qiita

gulp をやめて webpack

gulpでjsのビルドをしていたのだけれど、色々あってjsのビルドはwebpackを使うことにした。

以下のページを参考に、環境構築をしてみる。

webpackをインストール

グローバル

npm install -g webpack

プロジェクトにも

npm install --save-dev webpack

他のパッケージもインストール

グローバル

npm install -g babel

プロジェクト

npm install --save-dev react react-dom babel-core babel-loader babel-preset-es2015 babel-preset-react

webpackの場合は、babelを使う為にbabel-loaderやbabel-coreなどが必要らしい。

あとはgulpのときにも使用していたパッケージだけど一応書いておいた。

参考ページにならって進める

引き続き以下のページにならって進めたらできると思う。

Webpackでイチから作るReact.js開発環境 - Qiita

その他

以下のページも読んでおくと.babelrcのことなども書いてあって良いかも。

babelとwebpackを使ってES6でreactを動かすまでのチュートリアル - Qiita

さくらのVPSを使う その0015 HeidiSQLでMySQLホストに接続する

vagrantMySQLホストに接続したときの過去記事

vagrantその0026 HeidiSQLでvagrant内のMySQLホストに接続する - MOTOMICHI WORKS BLOG

記事の為に、仮のユーザー名, パスワード, ポート, IP

例えば「さくらのVPSを使う その0001 申し込みからsshログインに関わる設定 - MOTOMICHI WORKS BLOG」みたいな感じで、サーバーにログインするユーザー名とパスワード、MySQLに接続するユーザー名とパスワードなどを以下のように設定したことにする。
ポートはそれぞれ初期値を例とする。

  • サーバーユーザー名 : hoge
  • サーバーパス : hogepass
  • サーバーのポート : 22
  • MySQLユーザー名 : root
  • MySQLパス : myhogepass
  • MySQLのポート : 3306

VPSのサーバーのIPは契約したときメールで送られてくると思うけど、仮に000.00.000.00という事にする。

HeidiSQLの設定

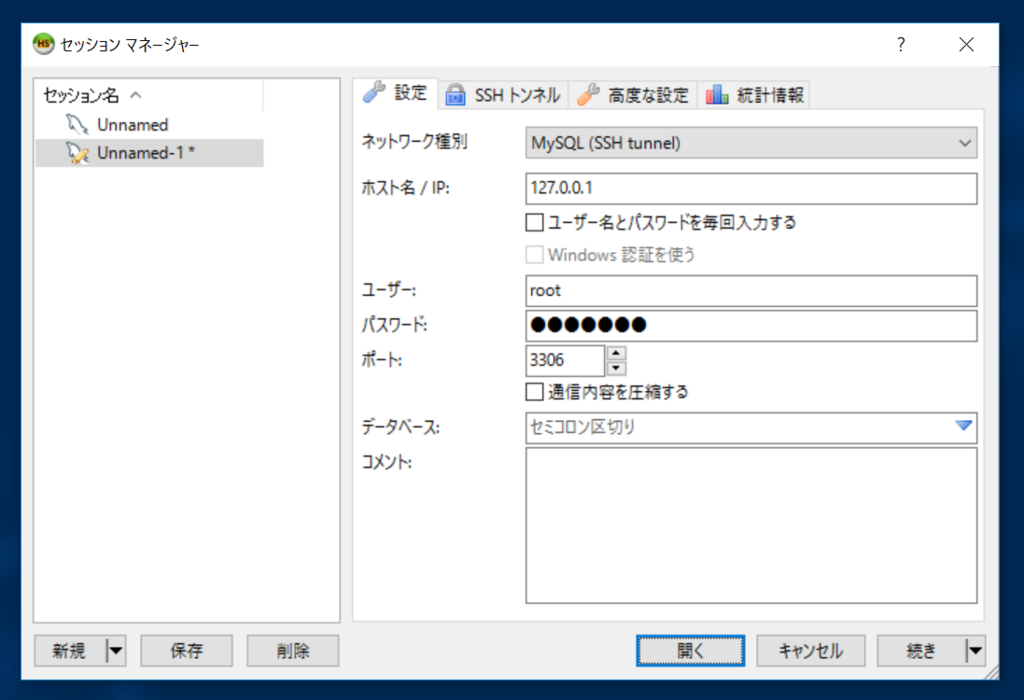
設定タブ

  • ネットワーク種別 : MySQL(SSH tunnel)
  • ホスト名/IP : 127.0.0.1
  • ユーザー : root
  • パスワード : myhogepass
  • ポート : 3306

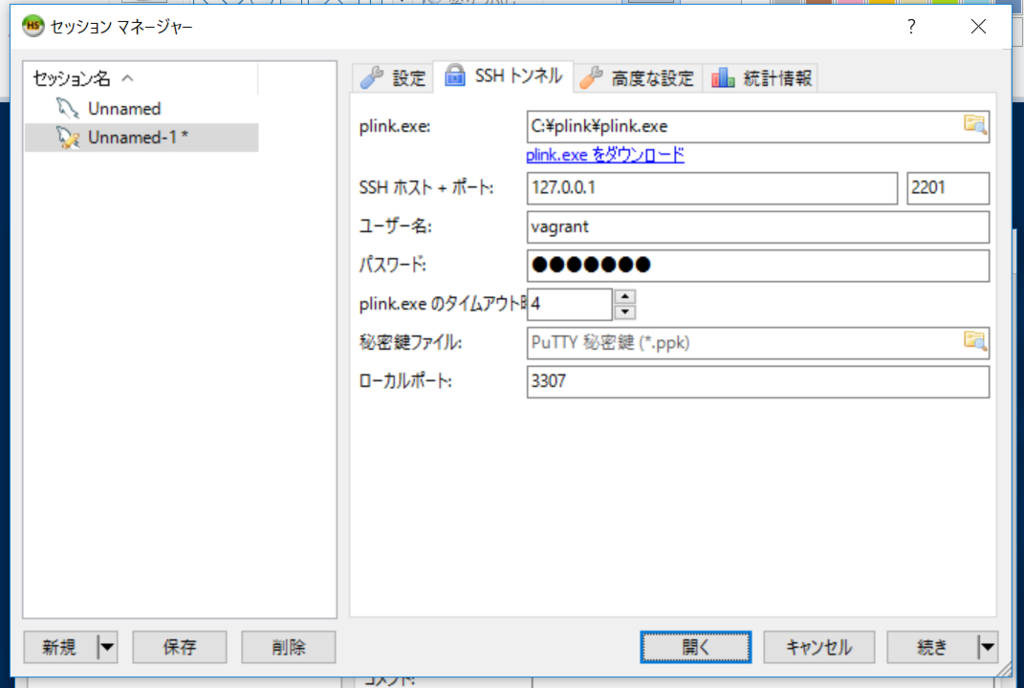
SSHトンネルタブ

タイムアウト時間は15とか20に伸ばした方が良いという情報もあるけど、私は4で接続できた。

あとは空白で。
今回の例では秘密鍵も空白で接続できる。

vagrantその0026 HeidiSQLでvagrant内のMySQLホストに接続する

参考にさせて頂いたページ

今回のおおよそのこと

VirtualBox Vagrant上のMySQLにHeidiSQLで接続する方法 | Lancork

Vagrant vccw のMySQLデータベースにHeidiSQLで接続する – セルティスラボ

Macでやってたときの記事

vagrantその11 SequelProで仮想環境内のMySQLデータベースに接続する - MOTOMICHI WORKS BLOG

can't connect to mysql server on 'localhost' (10061) について

linux - Can't connect to Vagrant using HeidiSQL: "Can't connect to MySQL server on 'localhost'" - Stack Overflow

vagrantSSHの設定を表示する

VagrantインスタンスにSSHでログインする - Qiita

plink.exeをダウンロードして配置する

PuTTY Download Page

For Windows on Intel x86plink.exe をダウンロードした。

任意の場所で良いけどC:\plink\plink.exeとなるように置いた。

HeidiSQLのインストール

Download HeidiSQL」でインストーラーをダウンロードして、HeidiSQL_9.3.0.4984_Setup.exeを実行した。

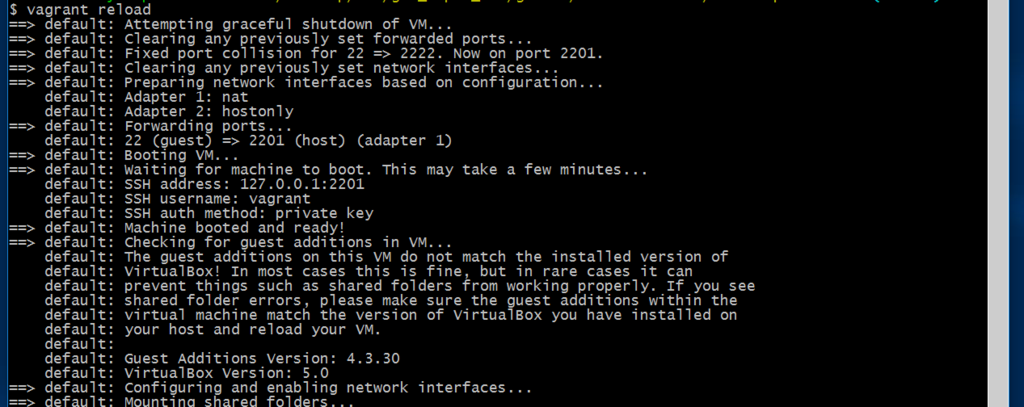
vagrant up とか vagrant reload したときに表示される情報

vagrant up とか vagrant reload したときに表示される以下のような情報を使って接続する。

f:id:motomichi_works:20160720035349p:plain

例えばこんな感じでMySQLをインストールしたことにして以降の話をする

さくらのVPSを使う その0003 Mysqlをインストールする - MOTOMICHI WORKS BLOG

HeidiSQLで接続する

設定タブ

まずは設定タブ内の情報を入力する。

f:id:motomichi_works:20160720035408p:plain

  • ネットワーク種別「MySQL(SSH tunnel)」を選ぶ
  • ホスト名/IPは普通にvagrant内にMySQLをインストールしたら「127.0.0.1
  • まだrootユーザーしかいないので「root」
  • パスワードはMySQLインストール時に設定したもの
  • ポートは初期値の場合「3306」

SSHトンネルタブ

次にSSHトンネルタブ内の情報を入力する。

f:id:motomichi_works:20160720035417p:plain

  • plink.exeはC:\plink\plink.exeにさっき置いたので。
  • SSHホスト+ポートはvagrant upしたときに表示されるSSH addressのところだと思う。SSH address: 127.0.0.1:2201のところ。今回の例では2201だけど、自分の環境をよく見た方が良い。
  • ユーザー名はvagrant upしたときに表示されるSSH usernameのところ。
  • パスワードは「vagrant
  • あとは初期値が入っていたのでそのまま「4」とか「3307」とかになってるし、秘密鍵ファイルは指定していない。

「設定」と「SSHトンネル」両方の入力が完了したら、開くボタンを押下する。

なんか聞かれる

f:id:motomichi_works:20160720035421p:plain

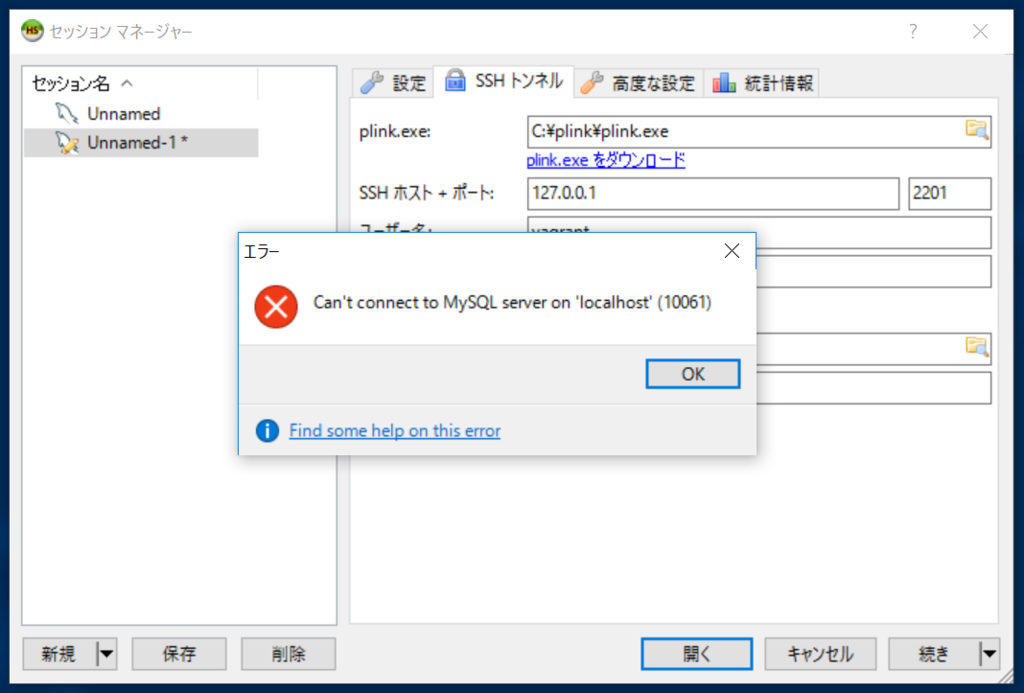
なぜかエラーになり、なぜか解決

なぜか以下のようなエラーが発生した。

can't connect to mysql server on 'localhost' (10061)

f:id:motomichi_works:20160720035424p:plain

検索してみると、以下のページが出てきた。

linux - Can't connect to Vagrant using HeidiSQL: "Can't connect to MySQL server on 'localhost'" - Stack Overflow

どうもvagrant reloadすると直るようなことが書いてあるようなので、vagrant reload してから、もう一度HeidiSQLで同じように入力して「開く」ボタンを押下したら接続できた。

vagrantのコンフィグを表示する

ついでに「VagrantインスタンスにSSHでログインする - Qiita」に書いてあったので残しておく。

エラーが解決した要因がよくわからないのであんまりすっきりしないけど、もうエラーは出ないし今回はここまで。

gulp-eslintの.eslintrcを作成する

参考にさせて頂いたページ

.eslintrcを公開してくださっているページ

.eslintrc晒す - Qiita

eslint

gulp-eslint

babelとか関係なくeslintについて包括的な基礎のこと

babel使用時の.eslintrcの記述などについて

babel-eslintのインストールについて

一部設定の日本語解説

ESLintのエラールール。日本語ざっくり解説[スタイル編] - Qiita

前提として

gulpとかeslintとか色々動くようになっている。

やりたいこと

.eslintrcの編集をして、設定を適切な感じにしていきたい。

babelを使用している環境で予約語に関するエラーが出たのでここは通したい

以下の通りエラーが出た。

1:1  error  Parsing error: The keyword 'import' is reserved

babel-eslintをインストールして.eslintrcに設定すると大丈夫らしいのでインストールする

以下の通りインストールした。

npm install --save-dev babel-eslint

コメントでご教示頂いたので直した

"parserOptions"というキーを適切に設定すると直る。

.eslintrcの作成

.eslintの配置はユーザー直下に置くとグローバルな設定になり、プロジェクト直下に置くとプロジェクトごとの設定が可能らしいので、とりあえず今回はプロジェクト用としてpackage.jsonと同じディレクトリに配置する。

下記二つページを参考にくっつけて調整してみた。

ecmaFeaturesキー

ecmaFeaturesキーは、ESLint 1.x.x か ESLint 2.x.x 以降かで書く場所が違うので注意が必要っぽい。

gulp+browserify+watchify+babelifyを導入してReact.jsのプロジェクトを作る

参考にさせて頂いたページ

以前作ったgulpのプロジェクト

gulpを使う場合

WebPackを使う場合

exorcistについて

「gulp, browserify, vinyl」と「vinyl-source-stream」について

vinyl-bufferについて

.babelrcとbabel-preset-es2015とbabel-preset-reactについて

今日の環境

  • Windows10
  • node v4.4.7
  • npm 2.15.8
  • gulp CLI version 3.9.1
  • browserify 13.0.1
  • その他 package.json 参照

グローバルにインストールするモジュール

gulp

browserify

watchify

babel

プロジェクトにインストールするモジュール

gulp browserify watchify gulp-babel babelify

react react-dom

babel-preset-es2015 babel-preset-react

Babelで書いたReactのJSXがNo Display Nameになる - はらへり日記」によると、「babel-preset-es2015」はES2015のコンパイルに必要とのこと。

「babel-preset-react」はJSXをコンパイルするのに必要とのこと。

gulp-uglify vinyl-source-stream vinyl-buffer

gulp-sourcemaps exorcist

インストールしていく

プロジェクトディレクトリとして、仮にreact-introductionディレクトリを作成して、進めることにする。

まず任意の場所に作成したreact-introductionディレクトリの中でinitして、package.jsonを作る

npm init

グローバルな領域にインストールする。既にインストールしている場合は良い。

npm install -g gulp browserify watchify babel

プロジェクトにインストールする

npm install --save-dev gulp browserify watchify gulp-babel babelify

npm install --save-dev react react-dom

npm install --save-dev babel-preset-es2015 babel-preset-react

npm install --save-dev gulp-uglify vinyl-source-stream vinyl-buffer

npm install --save-dev gulp-sourcemaps exorcist

この段階でのpackage.jsonの記述内容

{
  "name": "react-introduction",
  "version": "1.0.0",
  "description": "",
  "main": "index.js",
  "scripts": {
    "test": "echo \"Error: no test specified\" && exit 1"
  },
  "author": "",
  "license": "ISC",
  "devDependencies": {
    "babel-preset-es2015": "^6.9.0",
    "babel-preset-react": "^6.11.1",
    "babelify": "^7.3.0",
    "browserify": "^13.0.1",
    "exorcist": "^0.4.0",
    "gulp": "^3.9.1",
    "gulp-babel": "^6.1.2",
    "gulp-sourcemaps": "^1.6.0",
    "gulp-uglify": "^1.5.4",
    "react": "^15.2.1",
    "react-dom": "^15.2.1",
    "vinyl-buffer": "^1.0.0",
    "vinyl-source-stream": "^1.1.0",
    "watchify": "^3.7.0"
  }
}

gulpfile.jsの作成とその記述内容

/************************************************
 * コマンドラインから実行するtaskとその概要
 ************************************************/
 /**
  * コマンド : gulp browserify
  *     - jscompile()を実行
  */

 /**
  * コマンド : gulp watchify
  *     - JS__SRC__PATHの変更をトリガーにして、jscompile()を繰り返し実行
  */


/************************************************
 * モジュール読み込み
 ************************************************/
 var gulp        = require('gulp');
 var babel       = require('gulp-babel');
 var sourcemaps  = require('gulp-sourcemaps');
 var browserify  = require('browserify');
 var watchify    = require('watchify');
 var babelify    = require('babelify');
 var uglify      = require('gulp-uglify');
 var source      = require('vinyl-source-stream');
 var buffer      = require('vinyl-buffer');


/************************************************
 * path設定
 ************************************************/
var JS__SRC__PATH             = './src/js';
var JS__RESULT__PATH          = './result/js'; // 完成品のJSが出力されるディレクトリ


/************************************************
 * tasks
 ************************************************/

/**
 * JS__SRC__PATHに対するコンパイルを一回実行するタスク
 *
 * @return {Object} gulp ストリーム
 */
gulp.task('browserify',function(){
  return jscompile(false);//引数がfalseなので監視しない
});

/**
 * JS__SRC__PATHを監視して、JS__SRC__PATHに対するコンパイルを繰り返し実行するタスク
 *
 * @return {Object} gulp ストリーム
 */
gulp.task('watchify',function(){
  return jscompile(true);//引数がtrueなので監視する
});

// jscompile関数を定義
function jscompile(is_watch){
  // 変数bundlerにwatchify()またはbrowserify()を格納
  var bundler;
  if(is_watch){
    bundler = watchify(browserify(JS__SRC__PATH + '/main.js'));
  }else{
    bundler = browserify(JS__SRC__PATH + '/main.js');
  }
  //関数rebundleを定義
  function rebundle(){
    return bundler
      .transform(babelify, {"presets": ["es2015", "react"]})
      .bundle()
      .on("error", function (err) { console.log("Error : " + err.message); })
      .pipe(source('main.js'))
      .pipe(buffer())
      .pipe(uglify())
      .pipe(gulp.dest(JS__RESULT__PATH));
  }

  bundler.on('update',function(){
    rebundle();
  });
  bundler.on('log',function(message){
    console.log( message );
  });
  return rebundle();
}

./src/js/main.jsの作成とその記述内容

import React from 'react';
import ReactDom from 'react-dom';
import Hoge from './child/react-components/hoge';

ReactDom.render(<Hoge />, document.getElementById('example'));

./src/js/react-components/child/hoge.jsの作成とその記述内容

import React, {Component} from 'react'

export default class Hoge extends Component {
  constructor(props) {
    super(props);
  }

  render() {
    return(
      <div className='hoge'>
        hoge element.
      </div>
    );
  }
}

react-introduction.htmlの作成とその記述内容

<!DOCTYPE html>
<html>
<head>
<meta http-equiv="X-UA-Compatible" content="IE=edge">
<meta charset="utf-8">
<title>react-tutorial</title>
<link rel="stylesheet" href="">
</head>
<body>

  <div id="example"></div>

<script type="text/javascript" src="./js/main.js"></script>
</body>
</html>

watchifyタスクでビルドしてみる

gulp watchify

できた。

react-introduction.htmlをブラウザで開いてみると、以下の要素が表示されている。

<div data-reactroot="" class="hoge">hoge element.</div>

これでES2015でReact.jsが使える環境が整ったので、今回はここまで。
Chocolateyその0001 Windows10にChocolateyをインストールして少し使ってみる

参考にさせて頂いたページ

Chocolatey - Installation

windowsの開発環境は一瞬で整うwith chocolatey - Qiita

Chocolateyを使った環境構築の時のメモ - Qiita

Windowsソフトを管理!パッケージ管理システムChocolateyでインストール、アップデートを簡単にする

Chocolateyとは

macでいうところのhomebrewみたいなものだそう。

コマンドで簡単にアプリケーションがインストールできて、依存関係の解決や、アップデートも簡単にできそうで良い。

今日の環境

2016年7月11日現在

  • Windows10
  • Chocolatey 0.9.10.3

インストールしようとしたら失敗した

公式サイトにあった以下のコマンドをそのまま実行したらエラーになった。
参考程度に貼っちゃったけど、コマンド自体は公式サイトから最新のものを使ってください。

@powershell -NoProfile -ExecutionPolicy Bypass -Command "iex ((new-object net.webclient).DownloadString('https://chocolatey.org/install.ps1'))" && SET PATH=%PATH%;%ALLUSERSPROFILE%\chocolatey\bin

エラー内容

エラーというのは以下のようなものだった。

Installation of Chocolatey to default folder requires Administrative permissions.
Please run from elevated prompt.
Please see https://chocolatey.org/install for details and alternatives if needing to install as a non-administrator.

発生場所 C:\Users\motomichi\AppData\Local\Temp\chocolatey\chocInstall\tools\chocolateysetup.psm1:211 文字:5
+     throw "Installation of Chocolatey to default folder requires Admi ...
+     ~~~~~~~~~~~~~~~~~~~~~~~~~~~~~~~~~~~~~~~~~~~~~~~~~~~~~~~~~~~~~~~~~
    + CategoryInfo          : OperationStopped: (Installation of...-administrator.:String) [], RuntimeException
    + FullyQualifiedErrorId : Installation of Chocolatey to default folder requires Administrative permissions. Please
    run from elevated prompt. Please see https://chocolatey.org/install for details and alternatives if needing to in
  stall as a non-administrator.

Google翻訳してみたら、

デフォルトのフォルダにチョコレートのインストールは管理者権限が必要です。高架プロンプトから実行してください。

とかそんな感じだったので管理者権限でコマンドプロンプトを実行しないといけないっぽい。

インストール成功する

管理者権限でコマンドプロンプトを起動して、やり直したらいくつかWARNINGが出たけどインストールできた様子。
以下のように表示された。

Downloading https://packages.chocolatey.org/chocolatey.0.9.10.3.nupkg to C:\Users\MOTOMI~1\AppData\Local\Temp\chocolatey\chocInstall\chocolatey.zip
Download 7Zip commandline tool
Downloading https://chocolatey.org/7za.exe to C:\Users\MOTOMI~1\AppData\Local\Temp\chocolatey\chocInstall\7za.exe
Extracting C:\Users\MOTOMI~1\AppData\Local\Temp\chocolatey\chocInstall\chocolatey.zip to C:\Users\MOTOMI~1\AppData\Local\Temp\chocolatey\chocInstall...

7-Zip (A) 9.20  Copyright (c) 1999-2010 Igor Pavlov  2010-11-18

Processing archive: C:\Users\MOTOMI~1\AppData\Local\Temp\chocolatey\chocInstall\chocolatey.zip

Extracting  _rels\.rels
Extracting  chocolatey.nuspec
Extracting  tools\chocolateyInstall.ps1
Extracting  tools\chocolateysetup.psm1
Extracting  tools\init.ps1
Extracting  tools\chocolateyInstall\choco.exe
Extracting  tools\chocolateyInstall\choco.exe.ignore
Extracting  tools\chocolateyInstall\LICENSE.txt
Extracting  tools\chocolateyInstall\helpers\chocolateyInstaller.psm1
Extracting  tools\chocolateyInstall\helpers\chocolateyProfile.psm1
Extracting  tools\chocolateyInstall\helpers\chocolateyScriptRunner.ps1
Extracting  tools\chocolateyInstall\helpers\ChocolateyTabExpansion.ps1
Extracting  tools\chocolateyInstall\helpers\functions\Format-FileSize.ps1
Extracting  tools\chocolateyInstall\helpers\functions\Get-CheckSumValid.ps1
Extracting  tools\chocolateyInstall\helpers\functions\Get-ChocolateyUnzip.ps1
Extracting  tools\chocolateyInstall\helpers\functions\Get-ChocolateyWebFile.ps1
Extracting  tools\chocolateyInstall\helpers\functions\Get-EnvironmentVariable.ps1
Extracting  tools\chocolateyInstall\helpers\functions\Get-EnvironmentVariableNames.ps1
Extracting  tools\chocolateyInstall\helpers\functions\Get-FtpFile.ps1
Extracting  tools\chocolateyInstall\helpers\functions\Get-OSArchitectureWidth.ps1
Extracting  tools\chocolateyInstall\helpers\functions\Get-ToolsLocation.ps1
Extracting  tools\chocolateyInstall\helpers\functions\Get-UACEnabled.ps1
Extracting  tools\chocolateyInstall\helpers\functions\Get-UninstallRegistryKey.ps1
Extracting  tools\chocolateyInstall\helpers\functions\Get-VirusCheckValid.ps1
Extracting  tools\chocolateyInstall\helpers\functions\Get-WebFile.ps1
Extracting  tools\chocolateyInstall\helpers\functions\Get-WebFileName.ps1
Extracting  tools\chocolateyInstall\helpers\functions\Get-WebHeaders.ps1
Extracting  tools\chocolateyInstall\helpers\functions\Install-BinFile.ps1
Extracting  tools\chocolateyInstall\helpers\functions\Install-ChocolateyDesktopLink.ps1
Extracting  tools\chocolateyInstall\helpers\functions\Install-ChocolateyEnvironmentVariable.ps1
Extracting  tools\chocolateyInstall\helpers\functions\Install-ChocolateyExplorerMenuItem.ps1
Extracting  tools\chocolateyInstall\helpers\functions\Install-ChocolateyFileAssociation.ps1
Extracting  tools\chocolateyInstall\helpers\functions\Install-ChocolateyInstallPackage.ps1
Extracting  tools\chocolateyInstall\helpers\functions\Install-ChocolateyPackage.ps1
Extracting  tools\chocolateyInstall\helpers\functions\Install-ChocolateyPath.ps1
Extracting  tools\chocolateyInstall\helpers\functions\Install-ChocolateyPinnedTaskBarItem.ps1
Extracting  tools\chocolateyInstall\helpers\functions\Install-ChocolateyPowershellCommand.ps1
Extracting  tools\chocolateyInstall\helpers\functions\Install-ChocolateyShortcut.ps1
Extracting  tools\chocolateyInstall\helpers\functions\Install-ChocolateyVsixPackage.ps1
Extracting  tools\chocolateyInstall\helpers\functions\Install-ChocolateyZipPackage.ps1
Extracting  tools\chocolateyInstall\helpers\functions\Install-Vsix.ps1
Extracting  tools\chocolateyInstall\helpers\functions\Set-EnvironmentVariable.ps1
Extracting  tools\chocolateyInstall\helpers\functions\Set-PowerShellExitCode.ps1
Extracting  tools\chocolateyInstall\helpers\functions\Start-ChocolateyProcessAsAdmin.ps1
Extracting  tools\chocolateyInstall\helpers\functions\Test-ProcessAdminRights.ps1
Extracting  tools\chocolateyInstall\helpers\functions\Uninstall-BinFile.ps1
Extracting  tools\chocolateyInstall\helpers\functions\Uninstall-ChocolateyEnvironmentVariable.ps1
Extracting  tools\chocolateyInstall\helpers\functions\Uninstall-ChocolateyPackage.ps1
Extracting  tools\chocolateyInstall\helpers\functions\UnInstall-ChocolateyZipPackage.ps1
Extracting  tools\chocolateyInstall\helpers\functions\Update-SessionEnvironment.ps1
Extracting  tools\chocolateyInstall\helpers\functions\Write-ChocolateyFailure.ps1
Extracting  tools\chocolateyInstall\helpers\functions\Write-ChocolateySuccess.ps1
Extracting  tools\chocolateyInstall\helpers\functions\Write-FileUpdateLog.ps1
Extracting  tools\chocolateyInstall\redirects\choco.exe
Extracting  tools\chocolateyInstall\redirects\choco.exe.ignore
Extracting  tools\chocolateyInstall\redirects\chocolatey.exe
Extracting  tools\chocolateyInstall\redirects\chocolatey.exe.ignore
Extracting  tools\chocolateyInstall\redirects\cinst.exe
Extracting  tools\chocolateyInstall\redirects\cinst.exe.ignore
Extracting  tools\chocolateyInstall\redirects\clist.exe
Extracting  tools\chocolateyInstall\redirects\clist.exe.ignore
Extracting  tools\chocolateyInstall\redirects\cpack.exe
Extracting  tools\chocolateyInstall\redirects\cpack.exe.ignore
Extracting  tools\chocolateyInstall\redirects\cpush.exe
Extracting  tools\chocolateyInstall\redirects\cpush.exe.ignore
Extracting  tools\chocolateyInstall\redirects\cuninst.exe
Extracting  tools\chocolateyInstall\redirects\cuninst.exe.ignore
Extracting  tools\chocolateyInstall\redirects\cup.exe
Extracting  tools\chocolateyInstall\redirects\cup.exe.ignore
Extracting  tools\chocolateyInstall\redirects\cver.exe
Extracting  tools\chocolateyInstall\redirects\cver.exe.ignore
Extracting  tools\chocolateyInstall\redirects\RefreshEnv.cmd
Extracting  tools\chocolateyInstall\tools\7z.dll
Extracting  tools\chocolateyInstall\tools\7z.exe
Extracting  tools\chocolateyInstall\tools\7z.exe.ignore
Extracting  tools\chocolateyInstall\tools\7z.exe.manifest
Extracting  tools\chocolateyInstall\tools\7zip.license.txt
Extracting  tools\chocolateyInstall\tools\checksum.exe
Extracting  tools\chocolateyInstall\tools\checksum.exe.config
Extracting  tools\chocolateyInstall\tools\checksum.exe.ignore
Extracting  tools\chocolateyInstall\tools\checksum.license.txt
Extracting  tools\chocolateyInstall\tools\detector.zip
Extracting  tools\chocolateyInstall\tools\shimgen.exe
Extracting  tools\chocolateyInstall\tools\shimgen.exe.ignore
Extracting  tools\chocolateyInstall\tools\shimgen.license.txt
Extracting  package\services\metadata\core-properties\1a0b5bbf338444a596bb1ebebba80b77.psmdcp
Extracting  [Content_Types].xml

Everything is Ok

Files: 87
Size:       11891084
Compressed: 7214019
Installing chocolatey on this machine
Creating ChocolateyInstall as an environment variable (targeting 'Machine')
  Setting ChocolateyInstall to 'C:\ProgramData\chocolatey'
WARNING: It's very likely you will need to close and reopen your shell
  before you can use choco.
Restricting write permissions to Administrators
We are setting up the Chocolatey package repository.
The packages themselves go to 'C:\ProgramData\chocolatey\lib'
  (i.e. C:\ProgramData\chocolatey\lib\yourPackageName).
A shim file for the command line goes to 'C:\ProgramData\chocolatey\bin'
  and points to an executable in 'C:\ProgramData\chocolatey\lib\yourPackageName'.

Creating Chocolatey folders if they do not already exist.

WARNING: You can safely ignore errors related to missing log files when
  upgrading from a version of Chocolatey less than 0.9.9.
  'Batch file could not be found' is also safe to ignore.
  'The system cannot find the file specified' - also safe.
chocolatey.nupkg file not installed in lib.
 Attempting to locate it from bootstrapper.
PATH environment variable does not have C:\ProgramData\chocolatey\bin in it. Adding...
Adding Chocolatey to the profile. This will provide tab completion, refreshenv, etc.
WARNING: Chocolatey profile installed. Reload your profile - type . $profile
Chocolatey (choco.exe) is now ready.
You can call choco from anywhere, command line or powershell by typing choco.
Run choco /? for a list of functions.
You may need to shut down and restart powershell and/or consoles
 first prior to using choco.
Ensuring chocolatey commands are on the path
Ensuring chocolatey.nupkg is in the lib folder

WARNINGで黄色く表示された箇所

上記したメッセージから抜粋すると下記の3箇所だった。

WARNING: It's very likely you will need to close and reopen your shell
  before you can use choco.
WARNING: You can safely ignore errors related to missing log files when
  upgrading from a version of Chocolatey less than 0.9.9.
  'Batch file could not be found' is also safe to ignore.
  'The system cannot find the file specified' - also safe.
WARNING: Chocolatey profile installed. Reload your profile - type . $profile

バージョン確認

インストールされてパスが通っているかを確認したいのでバージョン確認をしてみる。

choco -v

アプリケーションをインストールしてみる

例えばFirefoxをインストールする場合は

cinst firefox

または

choco install firefox

Firefoxがインストールできる。

XMLでまとめてインストールする

windowsの開発環境は一瞬で整うwith chocolatey - Qiita」に紹介されているような感じでXMLにまとめておけば、PCを買い替えたときも簡単そう。

今回はここまで。

vagrantその0025 Windows10でvagrantを使う

参考にさせて頂いたページ

Windows10にVirtualBoxとVagrantでCentOSの仮想環境を作ってみた / ユービックログ

VagrantでBox追加時にエラーが出た時の話 - Naba Blog

今回の環境(使用したインストーラー)

virtualboxのインストール

Windows10にVirtualBoxとVagrantでCentOSの仮想環境を作ってみた / ユービックログ

を参考に環境構築をしていく。

VirtualBox-5.0.24-108355-Win.exe をダウンロードしてインストールした。

特に設定変更などはせずにインストールした。

C:\Program Files\Oracle\VirtualBox

にインストールした。

vagrantのインストール

vagrant_1.8.4.msi をダウンロードしてインストールした。

C:\HashiCorp\Vagrant\

にインストールした。

vagrant box add しようとしたらエラー

cd ~
vagrant box add 任意の名前 URL

したら以下のようなエラーが出た。

An error occurred while downloading the remote file. The error
message, if any, is reproduced below. Please fix this error and try
again.

Microsoft Visual C++ 2010 再頒布可能パッケージ をインストールしてエラーを解消する

VagrantでBox追加時にエラーが出た時の話 - Naba Blog

に倣って

をインストールした。

そのときのインストーラーは以下の二つ。

  • vcredist_x86.exe
  • vcredist_x64.exe

vagrant box add する

もういちど

Windows10にVirtualBoxとVagrantでCentOSの仮想環境を作ってみた / ユービックログ

にならって続きを行う。

CentOS 6.7 x64 (Minimal, Puppet 4.2.3, Guest Additions 4.3.30)

を選択することにしたので、

https://github.com/CommanderK5/packer-centos-template/releases/download/0.6.7/vagrant-centos-6.7.box

のboxを使う。

例えば以下のように

vagrant box add centos67box https://github.com/CommanderK5/packer-centos-template/releases/download/0.6.7/vagrant-centos-6.7.box

みたいな感じで実行する。

これは時間がかかる。

回線速度にもよるんだろうけど、うちは遅いので20分くらいかかった。

以下のように表示されてbox追加成功した。

==> box: Box file was not detected as metadata. Adding it directly...
==> box: Adding box 'centos67box' (v0) for provider:
    box: Downloading: https://github.com/CommanderK5/packer-centos-template/releases/download/0.6.7/vagrant-centos-6.7.box
    box:
==> box: Successfully added box 'centos67box' (v0) for 'virtualbox'!

以下のコマンドで追加済みのboxを確認する。

vagrant box list

vagrant init する

任意の場所に vagrant_sample ディレクトリを作成して進めてみる。

mkdir sample_vagrant cd sample_vagrant

centos67boxという名前でboxを追加したので

以下のコマンドを実行した。

vagrant init centos67box

以下のように表示された。

A `Vagrantfile` has been placed in this directory. You are now
ready to `vagrant up` your first virtual environment! Please read
the comments in the Vagrantfile as well as documentation on
`vagrantup.com` for more information on using Vagrant.

このディレクトリにVagrantfileができた。

vagrant up する

Windowsの場合は、ここからはコマンドプロンプトじゃなくて、msysgitでインストールされるgitbashを使うと良いと思う。

以下のコマンドを実行した。

vagrant up

以下のように表示されて成功した。

Bringing machine 'default' up with 'virtualbox' provider...
==> default: Importing base box 'centos67box'...
==> default: Matching MAC address for NAT networking...
==> default: Setting the name of the VM: vagrant_sample_default_1467987696042_15307
==> default: Clearing any previously set network interfaces...
==> default: Preparing network interfaces based on configuration...
    default: Adapter 1: nat
==> default: Forwarding ports...
    default: 22 (guest) => 2222 (host) (adapter 1)
==> default: Booting VM...
==> default: Waiting for machine to boot. This may take a few minutes...
    default: SSH address: 127.0.0.1:2222
    default: SSH username: vagrant
    default: SSH auth method: private key
    default:
    default: Vagrant insecure key detected. Vagrant will automatically replace
    default: this with a newly generated keypair for better security.
    default:
    default: Inserting generated public key within guest...
    default: Removing insecure key from the guest if it's present...
    default: Key inserted! Disconnecting and reconnecting using new SSH key...
==> default: Machine booted and ready!
==> default: Checking for guest additions in VM...
    default: The guest additions on this VM do not match the installed version of
    default: VirtualBox! In most cases this is fine, but in rare cases it can
    default: prevent things such as shared folders from working properly. If you see
    default: shared folder errors, please make sure the guest additions within the
    default: virtual machine match the version of VirtualBox you have installed on
    default: your host and reload your VM.
    default:
    default: Guest Additions Version: 4.3.30
    default: VirtualBox Version: 5.0
==> default: Mounting shared folders...
    default: /vagrant => C:/Users/motomichi/Desktop/all/vagrant_all/vagrant_sample

ここでこけることがよくあるし、実際そういうブログとかも多いと思うのでラッキーだった。

何年か前にwindows7とかMacOSXでやったときはvirtualboxvagrantのバージョンの組み合わせ次第で駄目だったり、WindowsBIOS設定を変更して、仮想化機能を有効にしないといけなかったり、色々躓いた。

仮想化機能の有効化については以下のような感じかな。

Windows7:Virtual PC(バーチャルPC)を使うには - 教えて!HELPDESK

仮想化機能を有効にするためのBIOS設定|テックウインド株式会社

仮想サーバにログインしてみる

以下のコマンドを実行した。

vagrant ssh

ログインできた。

rootユーザーにスイッチしてみる。

su

パスワードの入力を促されるので

vagrant

rootユーザーになった。

ログアウトしてみる。

exit
exit

仮想サーバをシャットダウンしておく。

vagrant halt

シャットダウンされた。

とりあえず今回はここまで。