Motomichi Works Blog

モトミチワークスブログです。その日学習したことについて書いている日記みたいなものです。

GoogleAPIその0002 JavaScriptでSearchConsoleAPIからデータを取得する

参考にさせて頂いたページ

Google Search Consoleについて

サーチコンソール(Google Search Console)の使い方と登録方法教えます

APIにリクエストする為のコードについて

Sites: list  |  Search Console API (Webmaster Tools API)  |  Google Developers

認証とか基本的なこと

以前の記事で、People APIからのデータ取得を例にやりました。

GoogleAPIその0001 JavaScriptでデータを取得するための認証とか基礎 - MOTOMICHI WORKS BLOG

プロパティの追加と所有権の確認(Google Search Consoleを使う)

APIとかいう前にWEBからGoogle Search Consoleを使ってみます。

Google Search Consoleとかを検索して、ページにアクセスし、以下の手順を実行します。

  • プロパティの追加
  • 所有権の確認

すると自分のwebサイトを登録して、それに紐づくデータが色々と閲覧できます。

このあたりは下記のページを参考にさせて頂きました。

サーチコンソール(Google Search Console)の使い方と登録方法教えます

これらのデータをAPIで取得したいと思います。

Google Search Console APIの有効化

以前の記事でPeople APIを有効化したように、Google API Consoleのページにアクセスして、今回はGoogle Search Console API APIを有効化します。

GoogleAPIその0001 JavaScriptでデータを取得するための認証とか基礎 - MOTOMICHI WORKS BLOG

有効化すると、以下のようなプルダウンから、メソッドのリストが確認でき、ON/OFFできます。
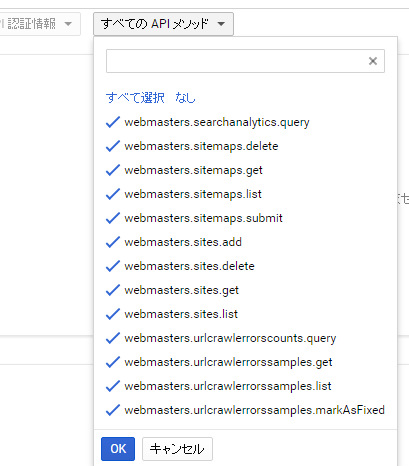
f:id:motomichi_works:20161119180344p:plain

一応文字に起こすと以下の通りです。

  • webmasters.searchanalytics.query
  • webmasters.sitemaps.delete
  • webmasters.sitemaps.get
  • webmasters.sitemaps.list
  • webmasters.sitemaps.submit
  • webmasters.sites.add
  • webmasters.sites.delete
  • webmasters.sites.get
  • webmasters.sites.list
  • webmasters.urlcrawlerrorscounts.query
  • webmasters.urlcrawlerrorssample.get
  • webmasters.urlcrawlerrorssample.list
  • webmasters.urlcrawlerrorssample.makeAsFixed

ソースコードを書く

以前の記事で書いたPeople APIで紹介したコードから、少し変更と追記をします。

スコープを追加する

半角スペース区切りで、複数のAPIに対してスコープを設定できるようです。

var scopes = 'profile https://www.googleapis.com/auth/webmasters.readonly';

readonlyじゃない場合は以下のような感じで書くようです。

https://www.googleapis.com/auth/webmasters

リクエストしてデータを取得する記述

webmasters.sites.listメソッドの例です。

        gapi.client.load('webmasters', 'v3', function() {
          console.log('webmasters v3 loaded.');

          var request = gapi.client.webmasters.sites.list({
            resourceName: 'sites'
          });

          request.execute(function(resp) {
            console.log(resp);
          });

        });

このコードについて

公式ドキュメントのページによると、

Sites: list  |  Search Console API (Webmaster Tools API)  |  Google Developers

以下のURLにリクエストするように書いてあったので、、

GET https://www.googleapis.com/webmasters/v3/sites

resourceName: 'sites'と書いています。

おまけ

Analytics APIの場合はscopesに半角スペース区切りで以下の文字列を追記します。

https://www.googleapis.com/auth/analytics.readonly

GoogleAPIその0001 JavaScriptでデータを取得するための認証とか基礎

参考にさせて頂いたページ

公式のGoogle People APIサンプル(認証して、Google People APIを使用するサンプル)

はじめてのアナリティクス API: ウェブ アプリケーション向け JavaScript クイックスタート

Google API Console のアカウント作成とログイン

まずは Google API Consoleのアカウントを作成してログインします。

APIに関する設定をする「API Manager」のページが表示されます。

色々と設定をする

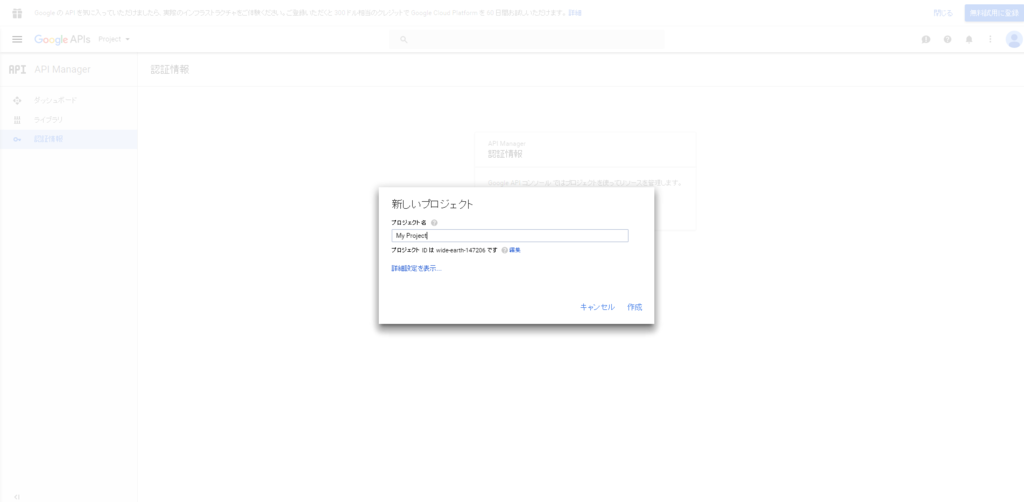
プロジェクト作成

  • 「プロジェクト作成」ボタンをクリックします。

f:id:motomichi_works:20161022230437p:plain

  • モーダルが表示され、「My Project」とデフォルトで入力さていたので、そのまま作成しました。

f:id:motomichi_works:20161022230549p:plain

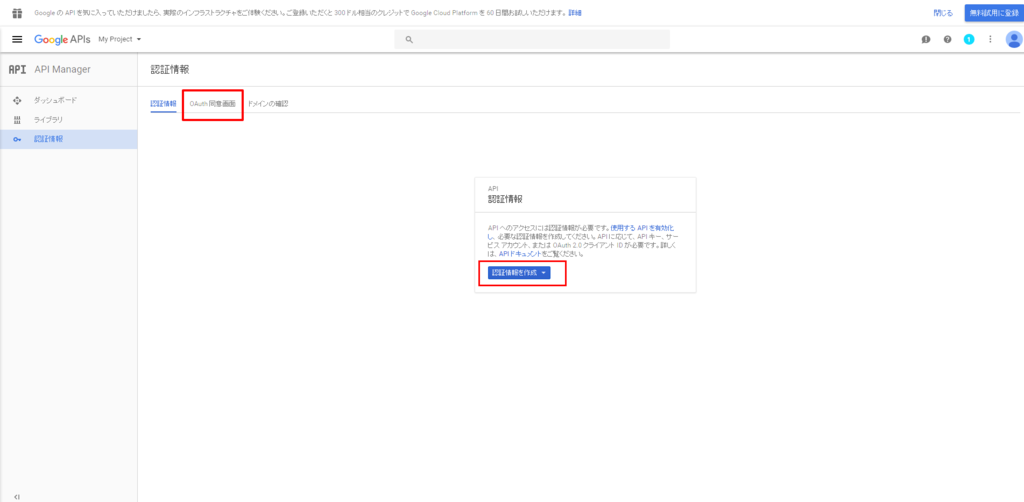
OAuth同意画面

  • 「OAuth同意画面」タブをクリック
  • 「認証情報を作成」ボタンをクリック

f:id:motomichi_works:20161022231516p:plain

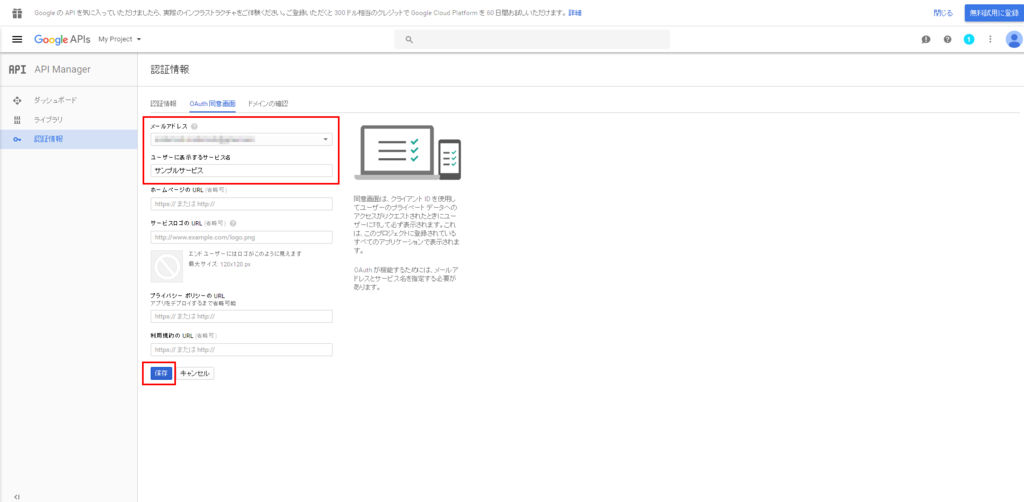
  • メールアドレス欄は自身がログイン中のメールアドレスを選択します。
  • サービス名は適当に「サンプルサービス」と入力しました。
  • あとは省略可能とのことなので、何も入力せず「保存」をクリックしました。

f:id:motomichi_works:20161022232522p:plain

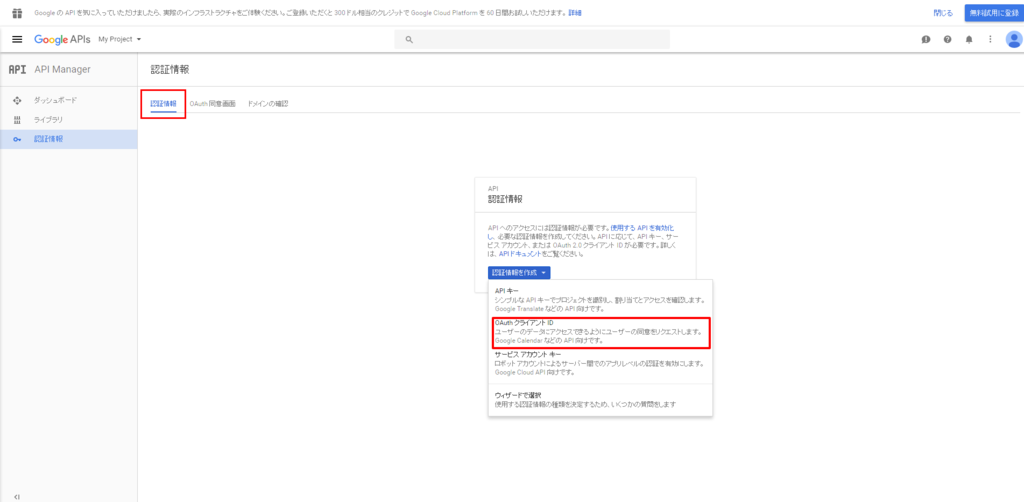
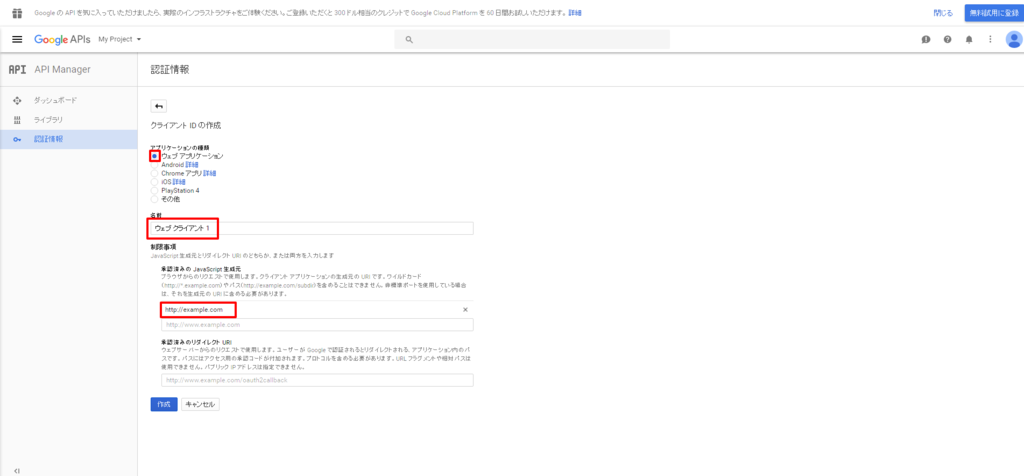
「承認URL」の設定と「OAuthクライアントID」の取得

  • 「認証情報」タブをクリックします。
  • 「認証情報を作成」ドロップダウンから「OAuthクライアントID」を選択します。

f:id:motomichi_works:20161022233103p:plain

f:id:motomichi_works:20161022235154p:plain

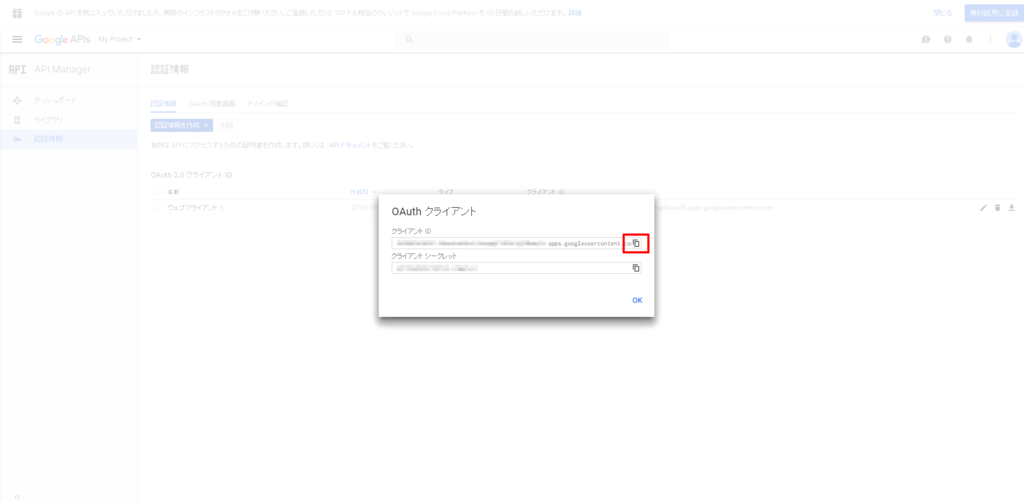
  • クライアントIDの横にあるアイコンをクリックして、テキストファイルにコピペしておきます。これは後でJSを書くときに使用します。
  • クライアントシークレットは今回は使用しません。
  • クライアントID、クライアントシークレットは後からでも確認できるので安心です。
  • 「OK」をクリックします。

f:id:motomichi_works:20161023001157p:plain

  • 登録が完了すると以下のような感じになります。

f:id:motomichi_works:20161023001208p:plain

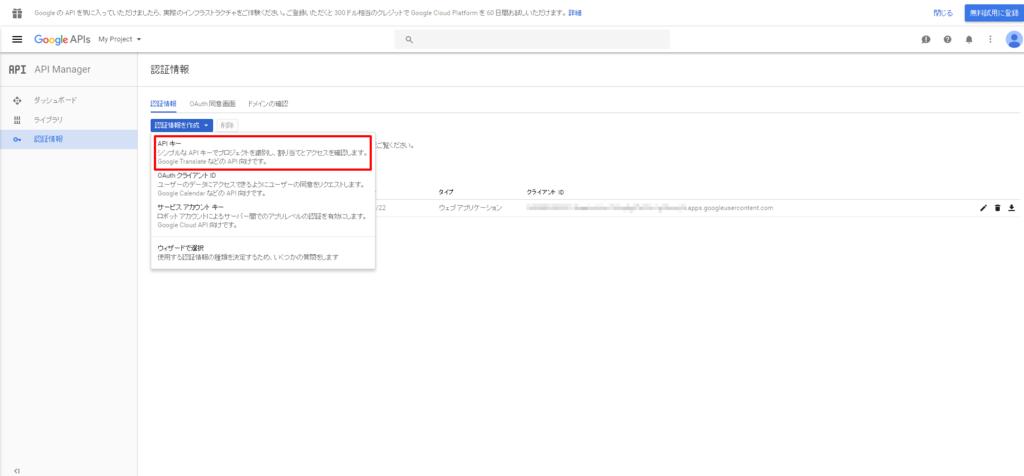
APIキーの取得

  • 「認証情報」タブをクリックします。
  • 「認証情報を作成」ドロップダウンから「OAuthクライアントID」を選択します。

f:id:motomichi_works:20161023002514p:plain

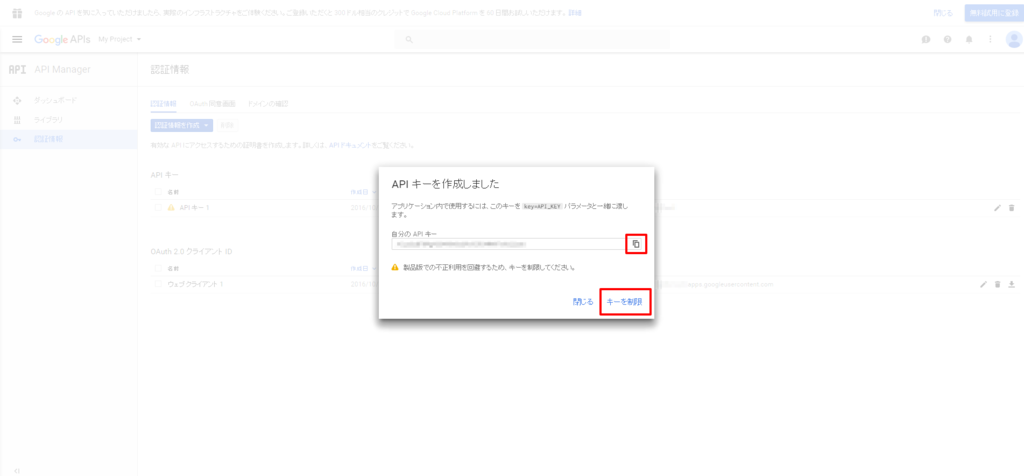
  • APIキーの横にあるアイコンをクリックして、テキストファイルにコピペしておきます。これも後でJSを書くときに使用します。

f:id:motomichi_works:20161023002841p:plain

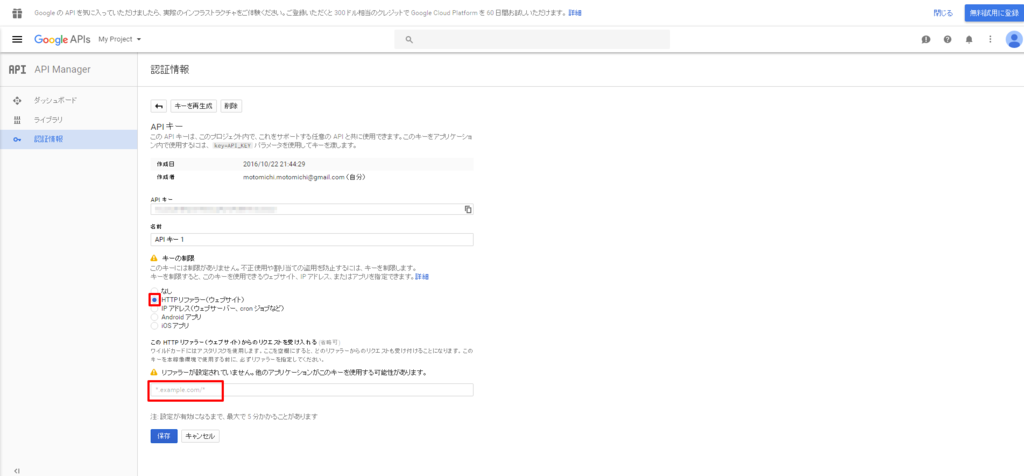
  • 名前は任意ですが初期値のまま「API キー 1」にしました。
  • ラジオボタン「HTTPリファラー(ウェブサイト)」を選択します。
  • "このHTTPリファラー(ウェブサイト)からのリクエストを受け入れる"の項目は例として「*example.com/*」ですが自身のドメインに合わせて設定してください。
  • 保存をクリックします。

f:id:motomichi_works:20161023004418p:plain

使いたいAPIを有効化する

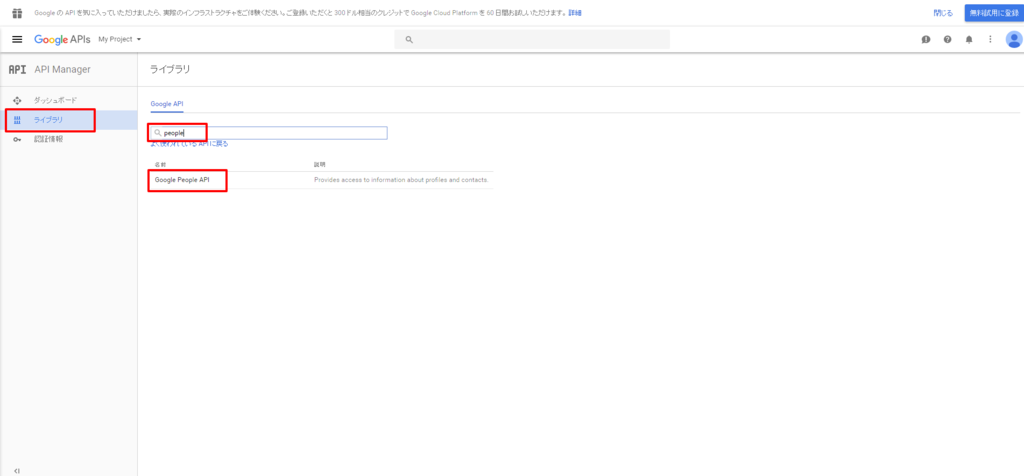
  • 例として Google People API です。
  • 「ライブラリ」をクリックして、フォームに「people」と入力すると、候補が出てくるので「Google People API」をクリックします。

f:id:motomichi_works:20161023010425p:plain

  • 「有効にする」をクリックします。

f:id:motomichi_works:20161023010900p:plain

  • ここで有効化することで、JSから以下のような感じで Google People API の バージョン1 がJSONを返してくれるようになります。htmlソースの全容はのちほど紹介します。
        gapi.client.load('people', 'v1', function() {
          var request = gapi.client.people.people.get({
            resourceName: 'people/me'
          });
          request.execute(function(resp) {
            var p = document.createElement('p');
            var name = resp.names[0].givenName;
            p.appendChild(document.createTextNode('Hello, '+name+'!'));
            document.getElementById('content').appendChild(p);
          });
        });

index.htmlの作成とその記述内容

<!--
  Copyright (c) 2011 Google Inc.
  Licensed under the Apache License, Version 2.0 (the "License"); you may not
  use this file except in compliance with the License. You may obtain a copy of
  the License at
  http://www.apache.org/licenses/LICENSE-2.0
  Unless required by applicable law or agreed to in writing, software
  distributed under the License is distributed on an "AS IS" BASIS, WITHOUT
  WARRANTIES OR CONDITIONS OF ANY KIND, either express or implied. See the
  License for the specific language governing permissions and limitations under
  the License.
  To run this sample, set apiKey to your application's API key and clientId to
  your application's OAuth 2.0 client ID. They can be generated at:
    https://console.developers.google.com/apis/credentials?project=_
  Then, add a JavaScript origin to the client that corresponds to the domain
  where you will be running the script. Finally, activate the People API at:
    https://console.developers.google.com/apis/library?project=_
-->
<!DOCTYPE html>
<html>
  <head>
    <title>Say hello using the People API</title>
    <meta charset='utf-8' />
  </head>
  <body>
    <p>Say hello using the People API.</p>

    <!--Add buttons to initiate auth sequence and sign out-->
    <button id="authorize-button" style="display: none;">Authorize</button>
    <button id="signout-button" style="display: none;">Sign Out</button>

    <div id="content"></div>

    <script type="text/javascript">
      // Enter an API key from the Google API Console:
      //   https://console.developers.google.com/apis/credentials?project=_
      var apiKey = 'YOUR_API_KEY';
      // Enter a client ID for a web application from the Google API Console:
      //   https://console.developers.google.com/apis/credentials?project=_
      // In your API Console project, add a JavaScript origin that corresponds
      //   to the domain where you will be running the script.
      var clientId = 'YOUR_WEB_CLIENT_ID.apps.googleusercontent.com';
      // Enter one or more authorization scopes. Refer to the documentation for
      // the API or https://developers.google.com/identity/protocols/googlescopes
      // for details.
      var scopes = 'profile';
      var auth2; // The Sign-In object.
      var authorizeButton = document.getElementById('authorize-button');
      var signoutButton = document.getElementById('signout-button');
      function handleClientLoad() {
        // Load the API client and auth library
        gapi.load('client:auth2', initAuth);
      }
      function initAuth() {
        gapi.client.setApiKey(apiKey);
        gapi.auth2.init({
            client_id: clientId,
            scope: scopes
        }).then(function () {
          auth2 = gapi.auth2.getAuthInstance();
          // Listen for sign-in state changes.
          auth2.isSignedIn.listen(updateSigninStatus);
          // Handle the initial sign-in state.
          updateSigninStatus(auth2.isSignedIn.get());
          authorizeButton.onclick = handleAuthClick;
          signoutButton.onclick = handleSignoutClick;
        });
      }
      function updateSigninStatus(isSignedIn) {
        if (isSignedIn) {
          authorizeButton.style.display = 'none';
          signoutButton.style.display = 'block';
          makeApiCall();
        } else {
          authorizeButton.style.display = 'block';
          signoutButton.style.display = 'none';
        }
      }
      function handleAuthClick(event) {
        auth2.signIn();
      }
      function handleSignoutClick(event) {
        auth2.signOut();
      }
      // Load the API and make an API call.  Display the results on the screen.
      function makeApiCall() {
        gapi.client.load('people', 'v1', function() {
          var request = gapi.client.people.people.get({
            resourceName: 'people/me'
          });
          request.execute(function(resp) {
            var p = document.createElement('p');
            var name = resp.names[0].givenName;
            p.appendChild(document.createTextNode('Hello, '+name+'!'));
            document.getElementById('content').appendChild(p);
          });
        });
        // Note: In this example, we use the People API to get the current
        // user's name. In a real app, you would likely get basic profile info
        // from the GoogleUser object to avoid the extra network round trip.
        console.log(auth2.currentUser.get().getBasicProfile().getGivenName());
      }
    </script>
    <script src="https://apis.google.com/js/api.js?onload=handleClientLoad"></script>
  </body>
</html>

Google People API からデータを取得してみる

  • 「Authorize」ボタンをクリックすると、「クライアントID」「APIキー」をもとに認証が行われます。
  • サインイン状態であれば、makeApiCall()関数が実行されます。
  • gapi.client.load()メソッドの引数として、API名とそのバージョン、コールバック関数を渡します。

参考までにエラーが出ていたときの話

  • 400エラーが出ていたときは、認証の際に送信する「クライアントID」または「APIキー」の値が間違っていました。
  • 403エラーが出ていたときは、Google People API が有効化されていませんでした。

おまけ

React.jsその0006 FluxとReduxも合わせて考えていくので記事を集めて読んでみる

参考にさせて頂いたページ

reactjs/redux の GitHub

reactjs/react-redux

FluxとReduxについてざっくり概要

Reduxについて入門ながらも詳細

react-reduxを使うサンプルコード

react-redux 公式のサンプルコード

その他

公式のサンプルコードを動かしたり、読んでみる

以下のURLにあるコードをコピペしていくと、「TODOをstateに追加して描画するアプリケーション」が動くようになった。

Example: Todo List · Redux

読んでみると、一通り基礎的な使い方はわかってきた。

JSでテストコードを書く その0001 まずは記事を色々読んでみる

参考にさせて頂いたページ

Mocha公式

Chai公式

概要が書かれている日本語のページ

以下の三つと、そこからリンクされているページを読んだら全く知識の無い状態からなんとなくわかってきました。

npmでeslint-config-airbnbを導入してみる

参考にさせて頂いたページ

ESLintでReactとES2015の構文チェック(eslint-config-airbnb) - dackdive's blog

ESLintをAtomに導入し、Reactの構文にも対応したAirbnbのJSスタイルガイドを使う | mae's blog

これまでのこと

以前「gulp-eslintの.eslintrcを作成する - MOTOMICHI WORKS BLOG」で色々インストールして、eslintのルールとかを適当に書いて使ってみるところまでやっていました。

前回の記事でeslintによる文法チェックは動作するので、eslint-config-airbnbをextendsすることでチェックされるルールが変わることになります。

eslint-config-airbnb をインストールしようとしたらエラーが出た

一か月ちょっと経った今日、airbnbのやつをextendsして少しいじる方向性にしようと思ったので、

ESLintでReactとES2015の構文チェック(eslint-config-airbnb) - dackdive's blog」を参考にインストールを試してみました。

以下のパッケージのうち、以前インストール済みのパッケージもあったので、

  • eslint-config-airbnb
  • eslint-plugin-import
  • eslint-plugin-react
  • eslint-plugin-jsx-a11y
  • eslint

足りない三つだけをインストールしようと思い、以下のコマンドを実行したらエラーが出ました。

npm install --save-dev eslint-config-airbnb eslint-plugin-import eslint-plugin-jsx-a11y

表示されたエラーの内容は以下の通りです。

npm WARN package.json dev-template-0001@1.0.0 No repository field.
npm WARN peerDependencies The peer dependency eslint@^3.3.0 included from eslint-config-airbnb will no
npm WARN peerDependencies longer be automatically installed to fulfill the peerDependency
npm WARN peerDependencies in npm 3+. Your application will need to depend on it explicitly.
npm WARN peerDependencies The peer dependency eslint-plugin-react@^6.0.0 included from eslint-config-airbnb will no
npm WARN peerDependencies longer be automatically installed to fulfill the peerDependency
npm WARN peerDependencies in npm 3+. Your application will need to depend on it explicitly.
npm WARN peerDependencies The peer dependency eslint@^3.3.1 included from eslint-config-airbnb-base will no
npm WARN peerDependencies longer be automatically installed to fulfill the peerDependency
npm WARN peerDependencies in npm 3+. Your application will need to depend on it explicitly.
npm ERR! Windows_NT 10.0.10586
npm ERR! argv "C:\\Program Files\\nodejs\\node.exe" "C:\\Program Files\\nodejs\\node_modules\\npm\\bin\\npm-cli.js" "install" "--save-dev" "eslint-config-airbnb" "eslint-plugin-import" "eslint-plugin-jsx-a11y"
npm ERR! node v4.4.7
npm ERR! npm  v2.15.8
npm ERR! code EPEERINVALID

npm ERR! peerinvalid The package eslint-plugin-react@5.2.2 does not satisfy its siblings' peerDependencies requirements!
npm ERR! peerinvalid Peer eslint-config-airbnb@10.0.1 wants eslint-plugin-react@^6.0.0

npm ERR! Please include the following file with any support request:
npm ERR!     C:\Users\motomichi\Desktop\all\git_repos_all\github\MotomichiWorks\dev-template-0001\npm-debug.log

どうも以前インストールした以下の二つのパッケージのバージョンが古いので eslint@^3.3.0 と eslint-plugin-react@^6.0.0 にupdateする必要がありそう。

普通に5個のパッケージを一緒にインストールしたらこんなエラーは出なかったんでしょうね。

package.jsonを編集してから以下のコマンドを実行しました。

npm update

新しいバージョンにアップデートされたので、改めてさっき失敗したコマンドを再度実行してみたら大丈夫でした。

npm install --save-dev eslint-config-airbnb eslint-plugin-import eslint-plugin-jsx-a11y

これでよし。

.eslintrcの作成とその記述内容

参考ページにならって以下の通り。

{
  "extends": "airbnb"
}

あとはairbnbのルールを基盤に適当にrulesを調整していこうと思います。

今回はここまで。

inline-blockの左右にできる隙間を解消する

参考にさせて頂いたページ

display:inline-block;でできた隙間をなくす4つの方法 | webledge

inline-blockを並べた場合に発生する「隙間」を消去するCSS » INSPIRE TECH

適切な方法は?

最近はletter-spacingの値に-0.40emを設定して埋めるのが検索上位に出てくるけど、個人的にはfont-size:0;を親要素に設定してる。

主流な方法というか、適切な方法はどれなんだろうか。

すぐに忘れてしまうのでちょっと書き留めておく。